Getting Started with JobScheduler in Android
Optimizing Android Apps with JobScheduler: A Detailed Guide on Enhancing Efficiency through Effective Background Task Management
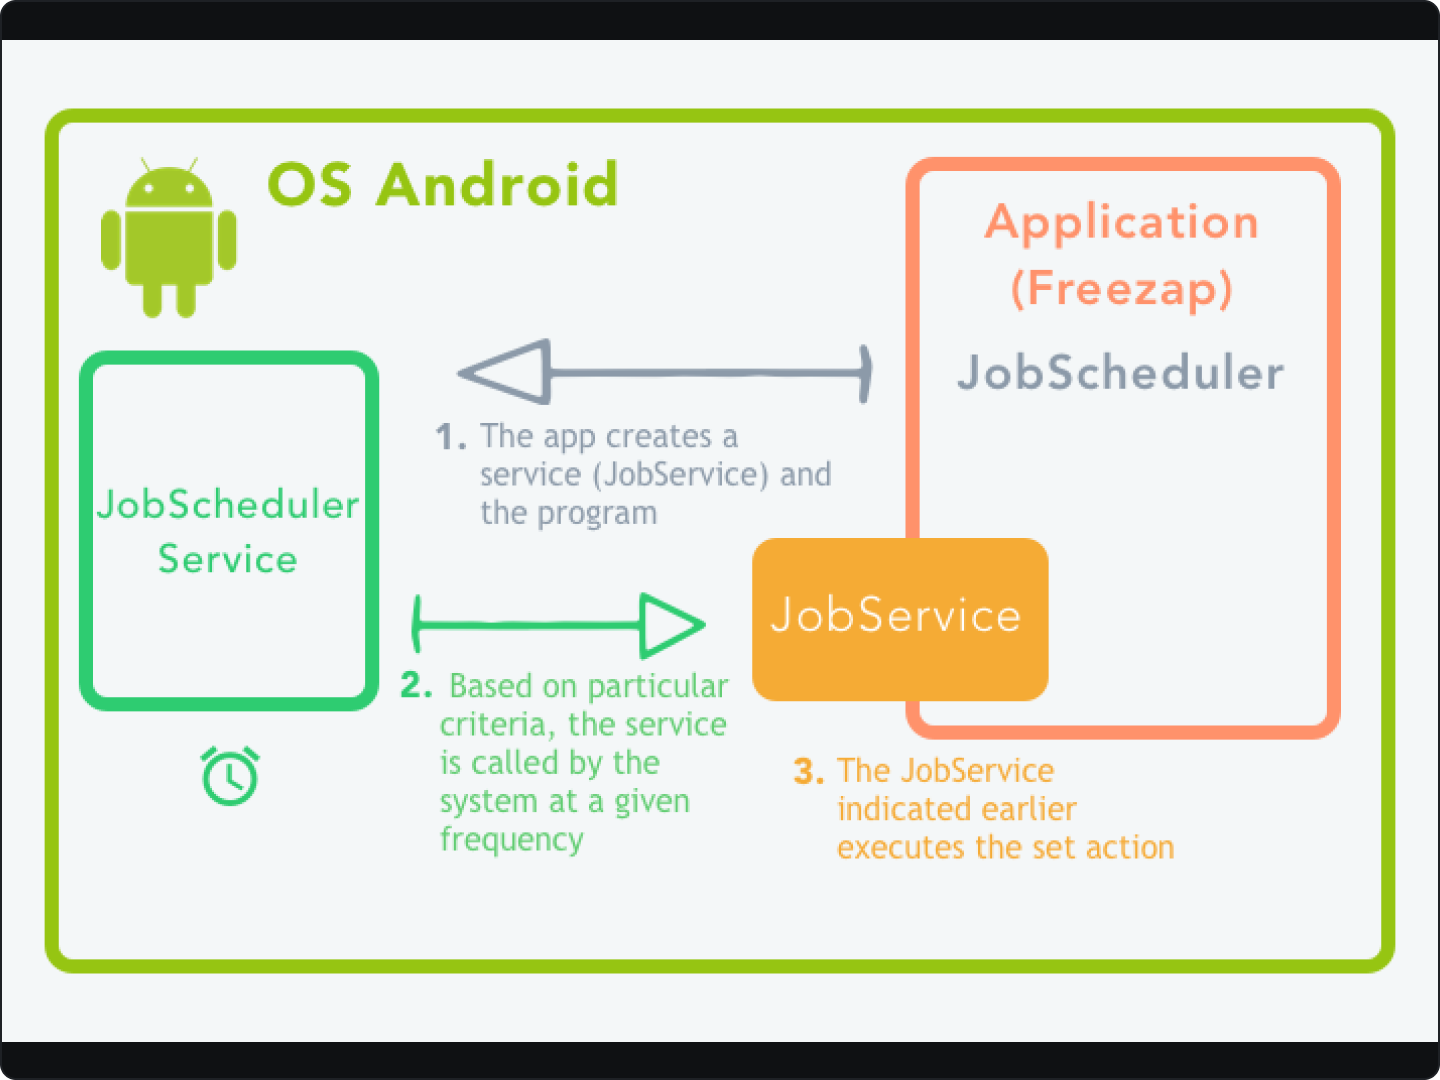
JobScheduler is a powerful Android component that manages the execution of background tasks, ensuring optimal system performance. It's a tool that allows developers to schedule tasks or jobs that need to be run under specific conditions. For example, a task might be set to run when the device is charging, when it's connected to an unmetered network, or when it's idle.
Why Use JobScheduler?
In the world of Android development, efficiency is key. Running too many tasks at once or running tasks when the device isn't in the right state can lead to poor performance and a bad user experience.
That's where JobScheduler comes in. By allowing developers to set conditions for when tasks should run, it helps ensure that the device's resources are used efficiently.
In this article, we'll dive deeper into how to use JobScheduler, including how to set different types of conditions and how to handle more complex jobs.
Understanding the Basics
JobScheduler is an API introduced in Android 5.0 (API level 21) that allows developers to schedule tasks or work for their apps.
This tool is a great way to optimize battery life and device performance, as it allows the system to batch jobs across all apps.
The system uses criteria like network status and charging state to determine the best time to run these jobs.
How does it work
Think of JobScheduler as a chef in a busy kitchen. The chef has multiple orders (jobs) to handle, but instead of cooking each order as it comes, the chef batches similar orders together to cook at the same time. This is how JobScheduler works. It batches similar jobs together to optimize the device's resources.
For example, if multiple apps have jobs that require a network connection, JobScheduler will batch these jobs together and run them when the device has an active network connection. This way, the device's radio doesn't have to constantly turn on and off, saving battery life.
Components
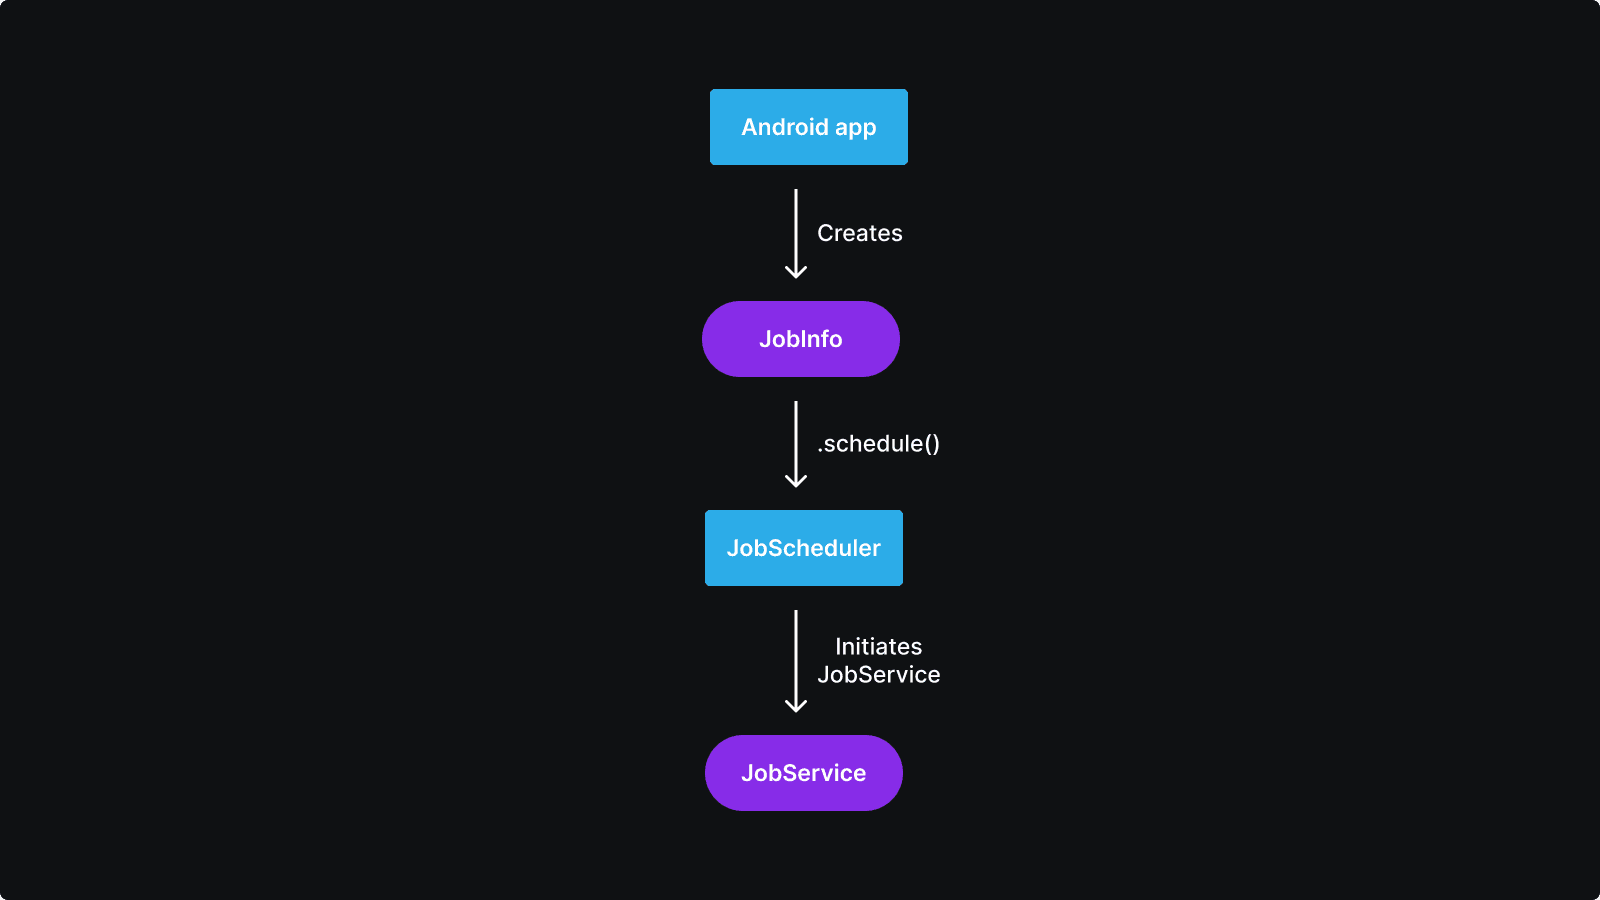
JobScheduler mainly consists of two components: JobService and JobInfo.
JobService: This is where the app defines what it wants to do. TheJobServiceis an abstract class that the app extends to define the work it wants to do in theonStartJob(JobParameters params)method.JobInfo: This is where the app defines the conditions under which it wants theJobServiceto run. TheJobInfoobject is built using theJobInfo.Builderclass.
Here's a basic example of how to use JobService and JobInfo:
public class MyJobService extends JobService {
    @Override
    public boolean onStartJob(JobParameters params) {
        // Do some work here
        return false; // Answers the question: "Is there still work going on?"
    }

    @Override
    public boolean onStopJob(JobParameters params) {
        return false; // Answers the question: "Should this job be retried?"
    }
}

JobInfo jobInfo = new JobInfo.Builder(123, new ComponentName(this, MyJobService.class))
    .setRequiresCharging(true)
    .setRequiredNetworkType(JobInfo.NETWORK_TYPE_UNMETERED)
    .build();

JobScheduler jobScheduler = (JobScheduler) getSystemService(JOB_SCHEDULER_SERVICE);
jobScheduler.schedule(jobInfo);
In this code, a new job is created that will only run when the device is charging and connected to an unmetered network. The job is then scheduled using the JobScheduler service.
Setting Up JobScheduler
Before setting up JobScheduler, ensure that your Android device is running on Lollipop (API 21) or higher, as JobScheduler is not available on lower versions.
Create a JobService
Creating your first JobService is an essential step in learning how to use the JobScheduler API. The JobService is an abstract class that you extend to define the parameters of your job. It has two methods that you need to override: onStartJob() and onStopJob().
Understanding JobService Methods
onStartJob(): This method is where you define the actions your job will perform. When the conditions set in your JobInfo object are met, the system calls this method to start your job.
onStopJob(): This method is called by the system if your job is stopped before completion. For example, this could happen if the conditions specified in your JobInfo object are no longer met.
Here's a basic example of a JobService:
public class ExampleJobService extends JobService {
    @Override
    public boolean onStartJob(JobParameters params) {
        // Do your work here

        return false; // Answers the question: "Is there still work going on?"
    }

    @Override
    public boolean onStopJob(JobParameters params) {
        // This is called if the job was cancelled before being finished
        // e.g. connectivity is lost

        return false; // Answers the question: "Should this job be retried?"
    }
}
Define the JobInfo
JobInfo is a crucial part of the JobScheduler API. It encapsulates the criteria for scheduling a job. These criteria can include conditions such as the device's charging state, network connectivity, and idle state.
The JobInfo object specifies the conditions for running the job. You can set various criteria like setting the job to run when the device is idle, charging, or connected to a certain type of network. Here's how you can create a JobInfo:
ComponentName componentName = new ComponentName(this, MyJobService.class);
JobInfo jobInfo = new JobInfo.Builder(1, componentName)
    .setRequiresCharging(true)
    .setRequiredNetworkType(JobInfo.NETWORK_TYPE_UNMETERED)
    .build();
Schedule the job
Job scheduling in Android is a vital feature that allows applications to schedule tasks to run in the background, optimizing the system's resources and battery life.
Once you have the JobService and JobInfo set up, you can schedule the job using the JobScheduler service. Here's how:
JobScheduler jobScheduler = (JobScheduler) getSystemService(JOB_SCHEDULER_SERVICE);
jobScheduler.schedule(jobInfo);
Advanced JobScheduler Techniques
Once you've mastered the basics of the JobScheduler API, you can start exploring some of its more advanced features. These techniques can help you optimize your app's performance and adapt to various device conditions.
Using Network Types
When scheduling a job, you can specify the type of network that the job requires. For instance, if a job involves downloading a large file, you might want to run it only when the device is connected to an unmetered network. You can set this requirement using the setRequiredNetworkType() method in the JobInfo.Builder class.
JobInfo jobInfo = new JobInfo.Builder(1, componentName)
    .setRequiredNetworkType(JobInfo.NETWORK_TYPE_UNMETERED)
    .build();
Handling Job Execution Delays
Sometimes, you might want to delay the execution of a job. For instance, if your app needs to sync data with a server, but it's not urgent, you can delay the job to a time when the device is idle. This can be achieved using the setOverrideDeadline() method.
JobInfo jobInfo = new JobInfo.Builder(1, componentName)
    .setOverrideDeadline(5000)  // Wait at most 5 seconds (5000 ms)
    .build();
In this example, the job will run after 5 seconds, regardless of any other conditions.
Persisting Jobs Across Reboots
By default, all scheduled jobs are removed when the device reboots. However, you can make a job persist across device reboots by using the setPersisted() method.
JobInfo jobInfo = new JobInfo.Builder(1, componentName)
    .setPersisted(true)
    .build();
In this example, the job will persist across device reboots. Note that in order to use this method, your app must hold the android.permission.RECEIVE_BOOT_COMPLETED permission.
These are just a few examples of the advanced techniques you can use with the JobScheduler API.
Common Problems and Best Practices
When working with the JobScheduler API, it's important to be aware of common pitfalls and best practices to ensure that your app runs efficiently and provides a good user experience. Here are some key points to consider:
Overusing JobScheduler
While JobScheduler is a powerful tool for running background tasks, it's not always the best solution for every situation. Overusing JobScheduler can lead to unnecessary battery drain and can slow down the device.
Best Practice: Use JobScheduler sparingly and only for tasks that need to run at specific times or under specific conditions. For simple tasks that need to run in the background, consider using other APIs like WorkManager or Handler.
Not Handling Network Conditions Properly
Jobs that require network access can fail if they're not properly configured to handle different network conditions.
Best Practice: Use the setRequiredNetworkType() method to specify the type of network your job requires. This ensures that your job only runs when the specified network type is available.
Not Releasing Resources
Failing to release resources like wakelocks can lead to battery drain and can cause your app to run inefficiently.
Best Practice: Always release resources when they're no longer needed. For example, if your job acquires a wakelock, make sure to release it once the job is done.
Not Handling Job Failures
Jobs can fail for a variety of reasons, such as network failures or system reboots. If your app doesn't handle these failures properly, it can lead to data loss or inconsistent app behavior.
Best Practice: Implement a retry strategy for your jobs. You can use the setBackoffCriteria() method to specify a backoff policy and initial backoff time.
Ignoring Battery Optimizations
Running jobs too frequently or at inappropriate times can lead to unnecessary battery drain.
Best Practice: Be mindful of the user's device battery. Schedule jobs during times when the device is likely to be charging, like overnight, or when it's connected to Wi-Fi.
Remember, the key to using JobScheduler effectively is understanding its capabilities and limitations. By avoiding these common pitfalls and following best practices, you can create apps that run efficiently and provide a great user experience.
FAQs
How can I ensure my JobScheduler job runs at the exact time specified?
JobScheduler is not designed to execute jobs at an exact time. Instead, it optimizes job execution based on conditions such as network availability and power supply. If exact timing is required, consider using AlarmManager instead.
How can I handle high-frequency scheduling with JobScheduler?
High-frequency scheduling can overwhelm the system and cause your app to be throttled. To avoid this, consider batching jobs or using other scheduling mechanisms that are more suited to high-frequency tasks.
To wrap up, understanding Android's JobScheduler is a significant milestone for any Android developer. It's a robust tool that can enhance your app's efficiency and user experience. However, it's crucial to use it correctly. Misusing JobScheduler can lead to issues like battery drain or app slowdowns. So, ensure you understand how and when to use it. Happy coding!